Get Started
Get Started with Application Development
Run the application on the Virtual Device
The framework includes a set of sample applications commonly found in wearable devices (wear-samples).
These sample applications serve as code examples, demonstrating best practices and how to use the Kernel APIs.
The framework also includes the Facer application (wear-facer-app).
This video demonstrates the Mock which can be used to inject sensor input and native data to applications when executing them on the Simulator:
As showcased on the video, the BLE connection to the companion app can also be mocked. For more information on this, please refer to our Bluetooth Mock documentation.
Executing code on the Simulator
In order to execute an Application on the Simulator:
Open the project
wear-samples(orwear-facer-appfor the Facer app),Wait for Gradle to load the project,
Open the Gradle tool window by clicking on the elephant icon on the right side,
Expand any
wear-<name>-appitem,From the nested
Taskslist, expand themicroejitem,Double-click on
runOnSimulator,
From the command line interface:
cd sources/wear-samples/wear-<name>-app
./gradlew runOnSimulator
Refer to the application flow in the section below for guidance on navigating the watch menus and displaying the app.
Note
To run all the applications at once in the simulator, run the task runOnSimulator of the project wear-runAll-app.
Warning
There is a known issue with JavaFX and Apple Silicon computers. The task runOnSimulator fails with
an error message: uncaught exception of type NSException. Please refer to the official documentation for more information.
Application Flow
Once the application is running on the Simulator, navigate using the following guidelines:
To open the Activity of an app:
Press the
KEY1button of the watch to open theActivitylauncher,Tap the app icon to open the
Activity.Press the
KEY1button of the watch to quit theActivity.
To open the Watchface of an app:
Long press on the current watchface to open the watchface picker,
Swipe to browse the installed watchfaces,
Tap the watchface thumbnail to open the watchface.
For more information about running applications on the Simulator, please refer to the official documentation.
Build a Virtual Device
Optionally, a Virtual Device can be built as a standalone executable of the simulated application. This is useful for demonstrating the application outside the development environment, such as for demos or presentations.
Use the Gradle task buildVirtualDevice in place of the task runOnSimulator, for example:
cd wear-<name>-app
./gradlew buildVirtualDevice
The Virtual Device can be found in the directory wear-<name>-app/build/virtualDevice.
For more information about building Virtual Devices, please refer to the official documentation.
Run the Application on the Hardware
Running an Application on the device consists of:
Running the Kernel on the device,
Building the Feature file (
.fo) of an Application,Deploying the Feature onto the device via Bluetooth, using the VEE Wear Companion Android app.
Note
The APK of the VEE Wear Companion Android app can be found in bin/.
Prerequisites
Before proceeding, please ensure that the following prerequisites are met:
Actions ATS3058S board is set up and ready for use, see Hardware Setup,
Docker is started (either Docker Engine or Docker Desktop).
Note
The Docker container is used to compile projects in an isolated environment which includes a specific toolchain. This allows application development on multiple operating system.
Run the Kernel on Device
To build the kernel and run it onto the connected device:
Open the Gradle tool window by clicking on the elephant icon on the right side,
Expand the item
wear-kernel,From the nested
Taskslist, expand themicroejitem,Double-click on
runOnDevice,
From the command line interface:
cd src/wear-kernel
./gradlew runOnDevice
The first time this is attempted, the Gradle task will fail with the following error:
> An error occurred in path/to/developer-package/src/wear-kernel/build/scripts/launch-veeport-script.ant:26:
=============== [ Initialization Stage ] ===============
VEE Port connected to BSP location 'path/to/developer-package/src/ats3085s-veeport/bsp' using platform option 'root.dir' in 'bsp/bsp.properties'.
[INFO ] Launching in Evaluation mode. Your UID is XXXXXXXXXXXXXXXX.
[ERROR] Invalid license check (No license found).
An active Evaluation License is required to build the executable. To activate your license:
Copy the UID displayed in the logs,
Follow the instructions provided in the official documentation.
When the Evaluation License is activated, run the runOnDevice Gradle task again.
Once the kernel is running on the device, applications can be deployed via Bluetooth (see the next section).
For more information about running applications on device, please refer to the official documentation.
Deploy an Application on the Device via Bluetooth
This section covers the process of building a Feature file (.fo) of an Application, and then deploying it onto the device using the VEE Wear Companion Android app.
The diagram below illustrates the complete process.
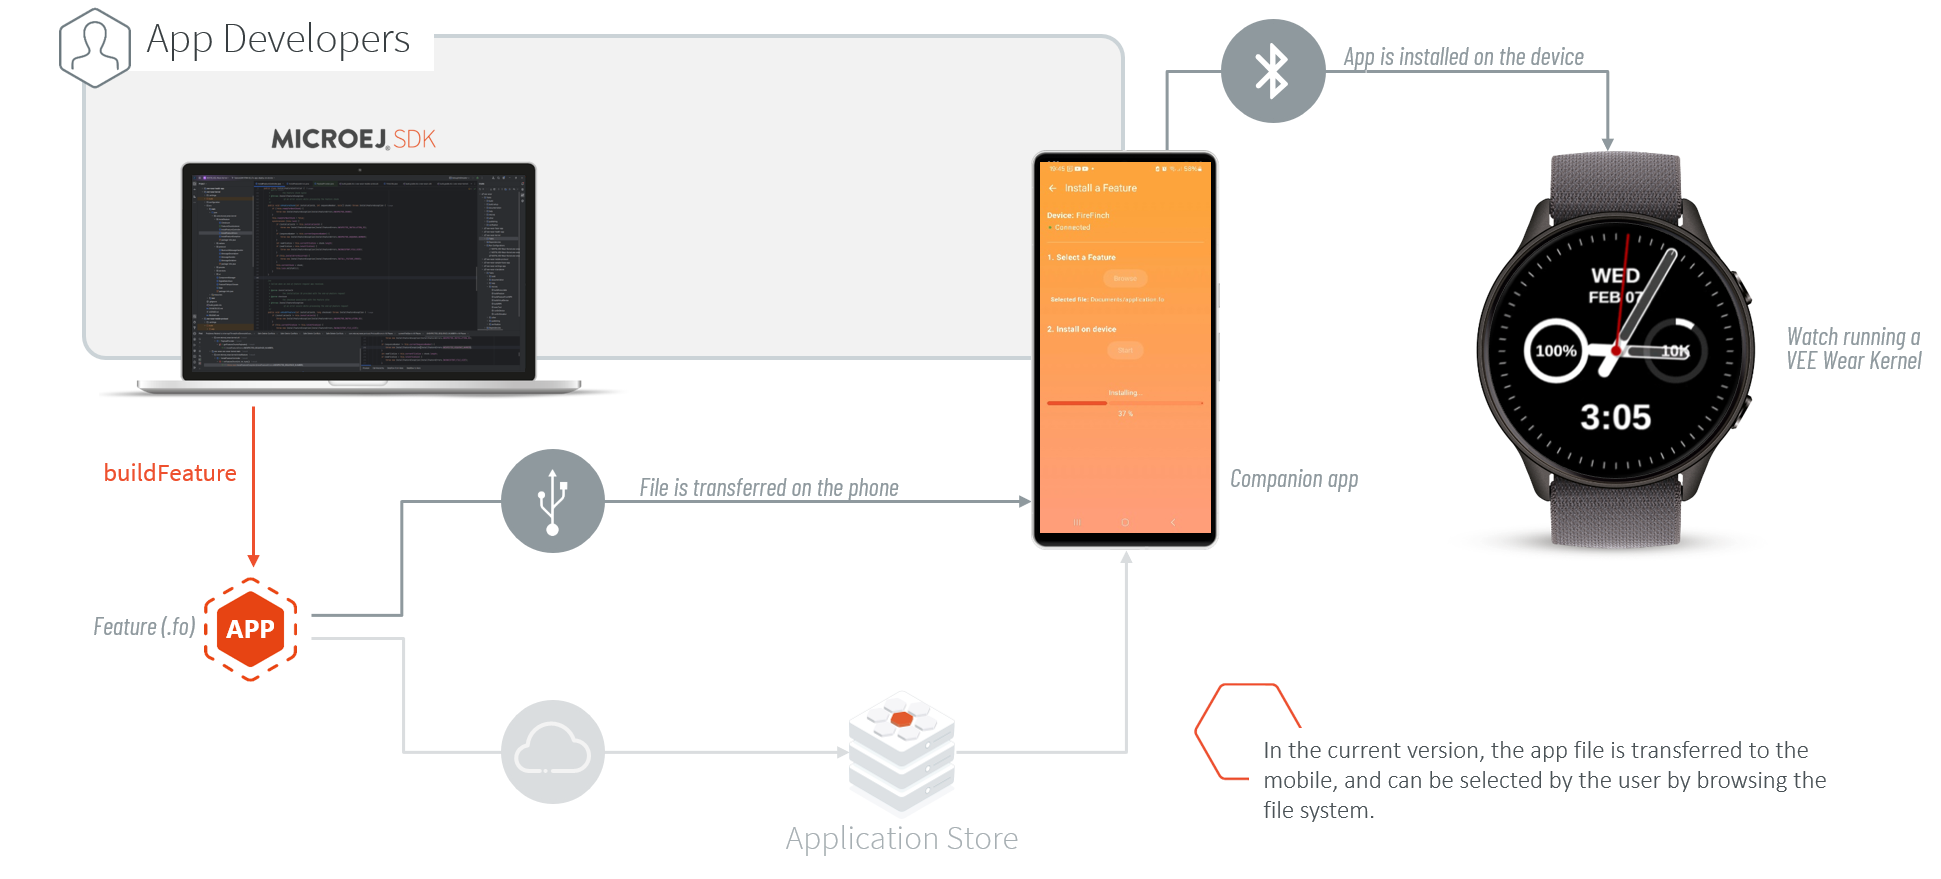
Application Deployment via Bluetooth
App Deployment and Facer Sync Demonstration
The following video demonstrates the process of deploying the Facer application using Bluetooth Low Energy (BLE). It also showcases how the device instantly has access to thousands of watch faces from the Facer store.
Note
Refer to the Facer User Guide for more information on using the Facer Application.
Build a Feature
In order to build a Feature:
Open the project
wear-samples(orwear-facer-appfor the Facer app),Open the Gradle tool window by clicking on the elephant icon on the right side,
Expand any
wear-<name>-appitem,From the nested
Taskslist, expand themicroejitem,Double-click on
buildFeature,
From the command line interface:
cd sources/wear-samples/wear-<name>-app
../gradlew buildFeature
At the end of the build, the Feature file (application.fo) can be found in the directory wear-<name>-app/build/application/feature.
You can then transfer this Feature file to a smartphone, using your preferred method (e.g. USB connection, SD card,…).
Note
The project wear-runAll-app is a wrapper application only used on the Simulator for running all the sample apps at once.
It is not designed for building a Feature, as the resulting Feature would not perform any operations on the device.
For more information about building Features, please refer to the official documentation.
Deploy a Feature
Deploying a Feature file consists of transferring the data of the .fo file from the mobile phone to the device via Bluetooth, using the VEE Wear Companion Android app.
This topic is covered in the VEE Wear Companion App User Guide, which provides complete information about the VEE Wear Companion app.
Note
The VEE Wear Companion app requires Android 13 or higher.
The APK can be found in bin/.
Get Started with Kernel and VEE Development
The Kernel and VEE Port included in this Developer Package are provided as examples of a possible implementation. Developers are encouraged to fork these projects or create their own in order to tailor them to their specific needs.
VEE Wear Services Library
The VEE Wear Services library allows VEE Wear Applications to communicate with the Kernel and with other Applications.
Each service represents a core aspect of the Kernel and Features, such as the ResourceService or the TimeService.
They are made available to the Features through the KernelServiceProvider which offers a method to retrieve the instance of each service.
This library can be extended to match your exact needs, and we encourage you to use the latest version in order to benefit from the built-in APIs.
Kernel
The Kernel manages the lifecycle of VEE Wear Apps and defines some key aspects of the device, like the Application Flow:
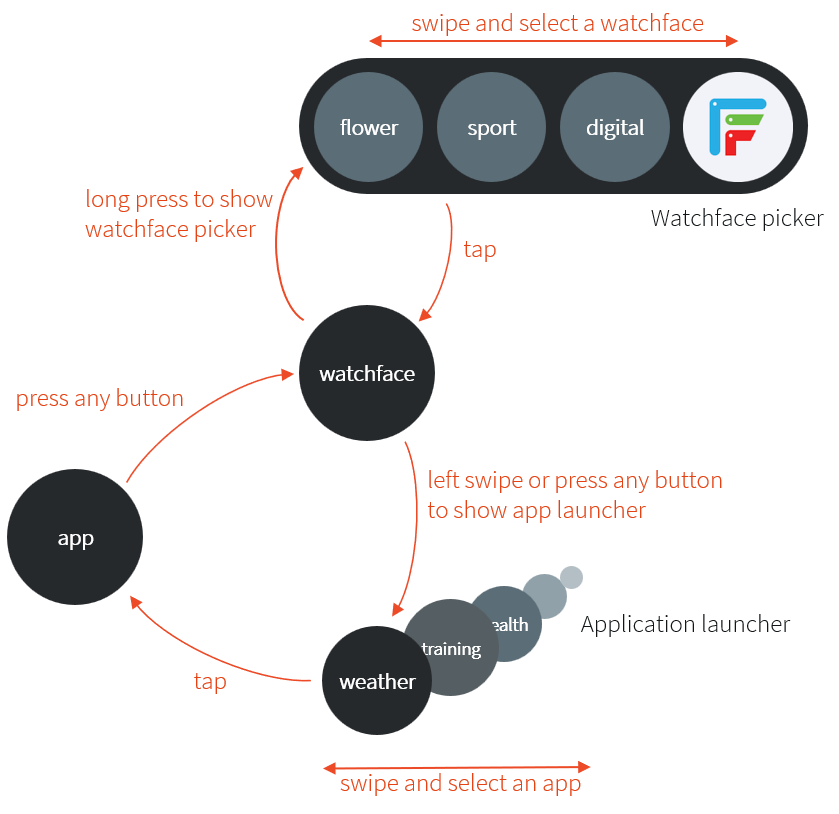
Application Flow
By modifying the Kernel, the developer can customize the product: the user’s interactions, the Watchface Picker and Activity Launcher behavior, or even decide which Application is started on boot.
In this Kernel sample, the navigation has been extracted to a Feature, the system-app feature, which needs to be included in all the sample Features.
This illustrates that most functionalities can be implemented either in the kernel or in a Feature, and it is on the Kernel developer to decide where it is most appropriate to implement them.
For more insights on Kernel development, please refer to the Kernel Developer Guide.
VEE Port
A VEE Port is a MicroEJ Architecture port for a specific device. It can be customized by using Packs to provide additional features, and it is responsible for the memory layout of each pack. Just as the Kernel, the VEE Port can be modified to best match your device and its performances.
For more insights on VEE Port development, please refer to the VEE Porting Guide.