Develop with VEE Wear
The VEE Wear framework is composed of several key components. The documentation and Javadoc for the current 2.2.0 developer package are available through the links below. For upcoming 3.0.0 API changes, see the 3.0.0 Preview section below.
VEE Wear Kernel
The VEE Wear Kernel is the core Application running on the wearable device. It manages the lifecycle of VEE Wear Apps.
The Kernel is board agnostic and can be fully customized to any hardware. It must be built from its source code (available on demand) with the VEE Port corresponding to the target hardware. The build generates an executable file and a Virtual Device which must be provided to app developers so that they can build their Apps.
The VEE Wear Kernel Application requires the following amount of memory:
RAM: around 400KB (mainly for Managed Heap and buffered images)
ROM: from 250KB to 1MB for each App (mainly for its images)
The Kernel provides the following APIs to the Apps:
Library | Version |
|---|---|
EDC | |
BON | |
Trace | |
FS | |
MicroUI | |
Drawing | |
MicroVG | |
Audio | |
Bluetooth | |
VEE Wear Services |
Note
This section is an excerpt of MicroEJ Official Documentation, please refer to the VEE Wear Kernel documentation for reference.
VEE Wear Services Library
The VEE Wear Services library allows VEE Wear Apps to communicate with the Kernel and with other Apps.
The library provides interfaces to services that are implemented by the Kernel:
Service | Provided Features |
|---|---|
register App components | |
get device information | |
create and delete external resources | |
get fonts | |
get health information | |
navigate across the UI | |
get time information |
The KernelServiceProvider class provides static methods to get an instance of every service. It also provides a shared instance of Timer, which can be used by any App to schedule tasks without creating an additional thread.
The library also provides interfaces to components that are implemented by the Apps:
Component | Provided Features |
|---|---|
shows a UI allowing to interact with a specific feature of the device | |
shows the current time and brief data with unique visuals | |
renders the UI of an Activity or Watchface | |
provides data that can be displayed on watchface complications |
Using ComponentService, Apps can register their own components into the Kernel. Once a component is registered, its lifecycle is managed by the Kernel: the Kernel will call the methods of the component when the user navigates in the relevant menus of the watch.
To use the VEE Wear Services, add the following line to the project build file:
implementation("com.microej.library.wear:wear-services:1.1.0")
Note
This section is an excerpt of MicroEJ Official Documentation, please refer to the VEE Wear Services Library documentation for reference.
Create an Application
You can also refer to the code in VEE-Wear-Samples as an example of how to use the framework APIs.
Apps are the cornerstone of VEE Wear: they provide exciting and unique features that make a smartwatch unforgettable. With VEE Wear, Apps can be deployed over USB or Bluetooth and installed dynamically on the device. Partial software update allows manufacturers to provide new features and bug fixes without having to validate and deploy an entire firmware.
Creating an App
To create an App project, follow these steps:
Create an SDK 6 Application project.
Open the
build.gradle.ktsfile.Add a dependency to the VEE Wear Services library: add
implementation("com.microej.library.wear:wear-services:1.1.0")in thedependenciesblock.
Implementing the Entry Point
The entry point of an App contains the code that will be called by the Kernel when the App is installed and uninstalled. The name of the entry point class must be declared in the build.gradle.kts file. The class should implement the FeatureEntryPoint interface.
The entry point can perform any operation, such as registering components, adding Bluetooth services or running timer tasks. However, the entry point is not the place to show a UI: this should be done by the Activities or Watchfaces registered by the App.
Note
Apps can use any library, as long as it doesn't require a Foundation Library that is not provided by the Kernel.
Implementing an Activity
Activities show a UI that allows the user to interact with a specific feature of the device. They are listed in the Activity Launcher:
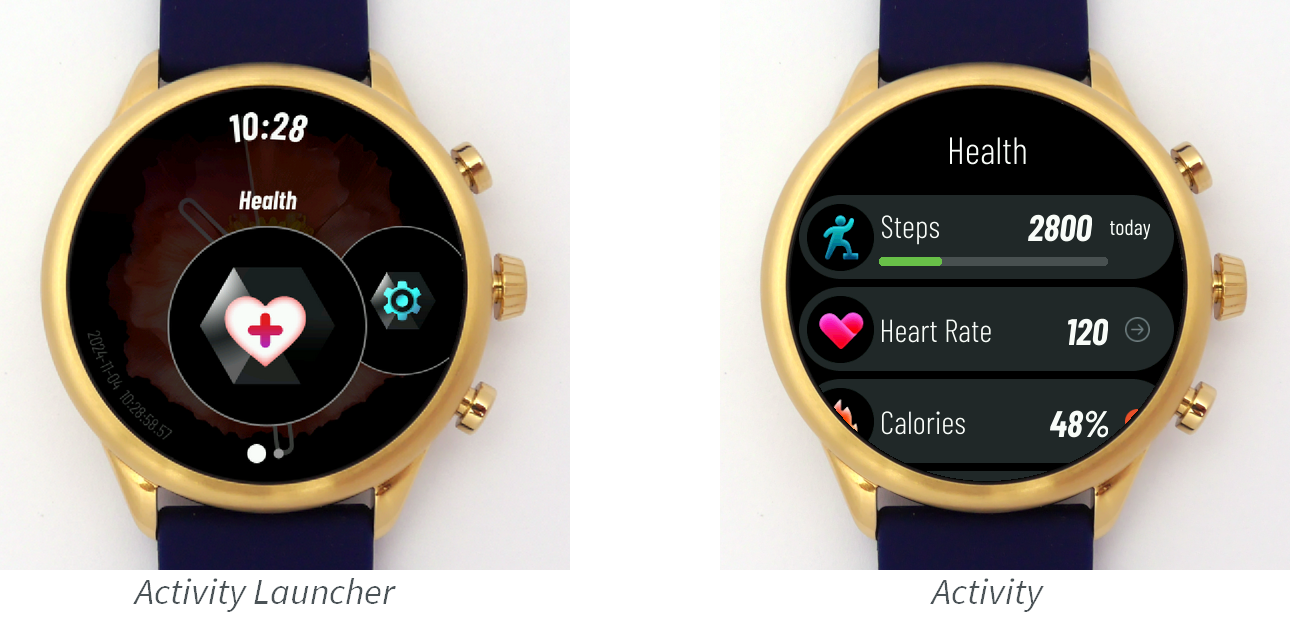
To implement an Activity, create a class that implements the Activity interface and its methods:
getName()should return the name of the Activity. This is the name that is visible in the Activity Launcher.renderIcon()should render the icon of the Activity in the given region. This is the icon that is visible in the Activity Launcher.createRenderable()should create the Renderable that renders the Activity (see Implementing a Renderable).
Once the Activity is implemented, make sure it is registered in the Kernel by calling ComponentService.registerActivity(). This method is usually called in the entry point of the App.
Implementing a Watchface
Watchfaces show the current time and brief data with unique visuals. They are listed in the Watchface Picker.
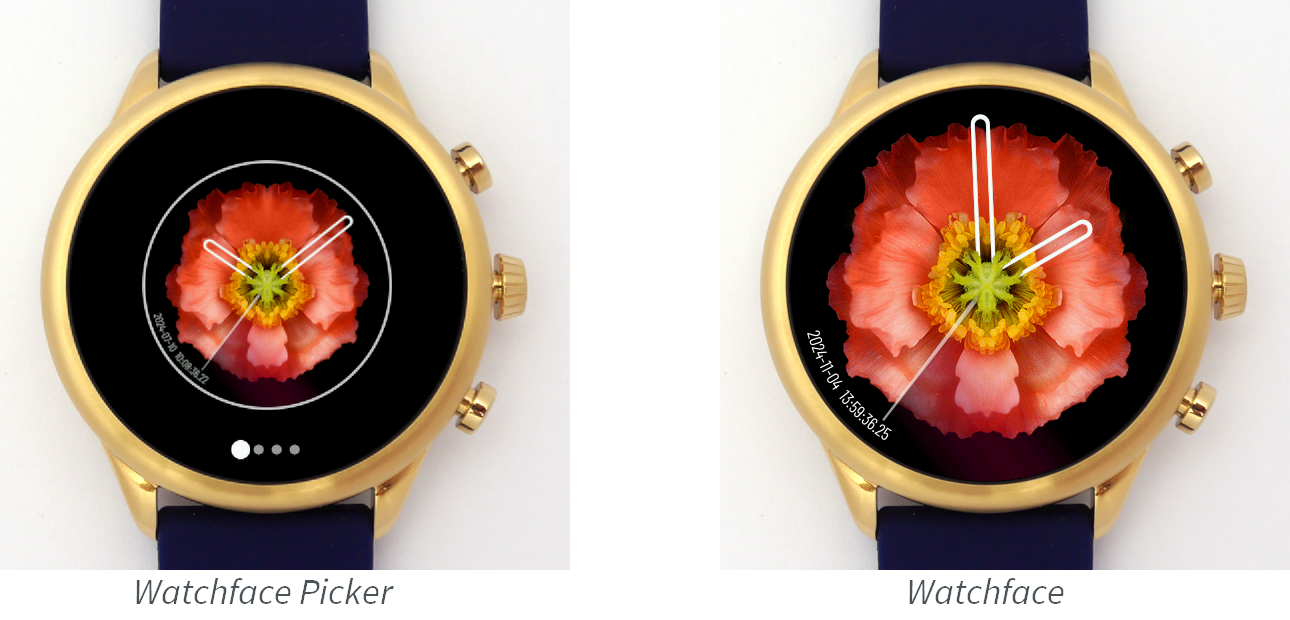
To implement a Watchface, create a class that implements the Watchface interface and its methods:
renderPreview()should render a preview of the UI in the given region. This is the preview that is visible in the Watchface Picker.createRenderable()should create the Renderable that renders the Watchface (see Implementing a Renderable). The renderable can use theComponentService.getComplicationDataSources()API to render complications that show data from third-party Apps.
Once the Watchface is implemented, make sure it is registered in the Kernel by calling ComponentService.registerWatchface(). This method is usually called in the entry point of the App.
Implementing a Renderable
A Renderable is a user interface which can be rendered on a graphics context during a transition and which can be shown in fullscreen on the display.
To implement a Renderable, create a class that implements the Renderable interface and its methods:
onAttached()should load the resources necessary for rendering the UI.onDetached()should dispose the resources loaded inonAttached().render()should render the UI on the given graphics context.showOnDisplay()should show on the display a Displayable that will render the UI in fullscreen and handle events.
The wear-util library provides 2 generic implementations of Renderable:
RenderableDesktop: Renderable based on a Desktop. Most often used for Activities that display rich UIs with widgets and scrolls.RenderableDisplayable: Renderable based on a Displayable. Can be used in most cases, for simple UIs or for performance/memory efficiency.
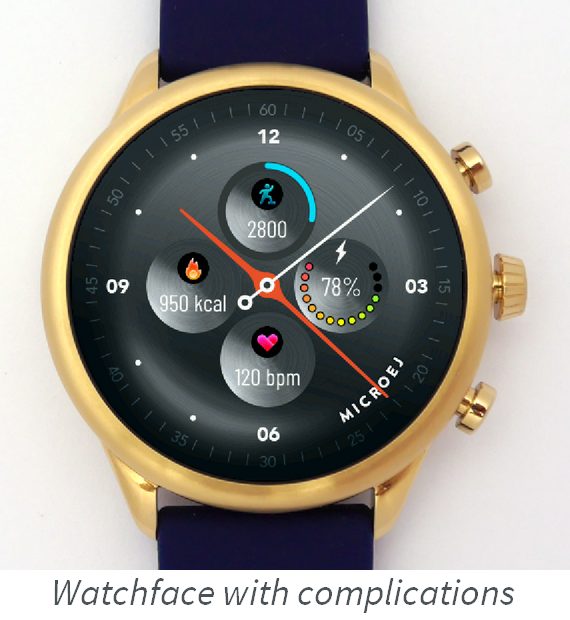
Implementing a Complication Data Source
A Complication Data Source provides data which can be displayed on a watchface complication. Complication Data Sources can provide a text, an icon and a progress value. Watchfaces can render complications the way they want using the data provided by the source.
To implement a Complication Data Source, create a class that implements the ComplicationDataSource interface and its methods:
hasText(),hasIcon()andhasProgress()should return whether the source provides the associated information.getText()andgetProgress()should return the associated information.renderIcon()should render the icon in the given region.
Once the Complication Data Source is implemented, make sure it is registered in the Kernel by calling ComponentService.registerComplicationDataSource(). This method is usually called in the entry point of the App.
Building an App
Selecting the Kernel
To be able to build your App, you must add a dependency to the VEE Wear Kernel by following these steps:
Open the
build.gradle.ktsfile.Define the path to the VEE Wear Framework on your machine: add
val veeWearFramework = "/path/to/VEE-Wear-Framework"Add a dependency to the VEE Wear Kernel: add
microejVee(files("$veeWearFramework/Virtual-Device", "$veeWearFramework/kernel.out"))in thedependenciesblock.
Building the App
Once the project is configured, the App can be built like any MicroEJ Application:
To test an App on simulator, launch the
runOnSimulatorGradle task.To build an App, launch the
buildFeatureGradle task. You can then install the App by deploying thebuild/feature/application/application.foFeature file to the watch over USB or Bluetooth.
Note
This section is an excerpt of MicroEJ Official Documentation, please refer to the VEE Wear Apps documentation for reference.
3.0.0 Preview — New API Libraries and Capabilities
The 3.0.0 preview release includes updated and new libraries for the VEE Wear framework. These libraries extend the kernel-to-feature service interfaces, event handling, data serialization capabilities, and low power management. The API documentation (Javadoc) for each library is included below.
This preview does not reflect a guaranteed roadmap.
Health for Wear Services
Health for Wear Services 4.0.0 Preview
The core service API library for VEE Wear. It defines the interfaces and data models used for communication between the kernel and feature applications. This includes component registration (activities, watchfaces, complications), device information access, health data models, font and resource management, and time services. This is the primary API surface for feature developers interacting with the kernel.
This version of Wear Services includes a Health service by default. The default 2.2.0 VEE Wear package uses a sample to demonstrate health monitoring capabilities.
The full API reference is available in the Health for Wear Services Javadoc.
Event
event 3.0.3
A lightweight event framework for MicroEJ applications. It provides the foundation for dispatching and handling events across application components, used by VEE Wear for user interactions, system notifications, and inter-component communication.
The full API reference is available in the Event Javadoc.
FlatBuffers
flatbuffers 2.1.0
A MicroEJ-compatible port of Google's FlatBuffers serialization library. FlatBuffers enables efficient serialization of structured data without parsing or unpacking overhead — data is accessed directly from the serialized buffer. In VEE Wear, it is used for high-performance data exchange between the kernel, features, and the BLE companion protocol.
The full API reference is available in the FlatBuffers Javadoc.
Protocol Buffers
protobuf4 1.0.1
A MicroEJ-compatible implementation of Google's Protocol Buffers (v4) serialization library. Protocol Buffers provide a language-neutral, platform-neutral mechanism for serializing structured data. In VEE Wear, protobuf is used alongside FlatBuffers for companion communication and data persistence where schema evolution and backward compatibility are required.
The full API reference is available in the Protocol Buffers Javadoc.
GNSS
gnss 2.0.0
A MicroEJ library providing access to Global Navigation Satellite System (GNSS) functionality.
It exposes a GnssManager API for managing GNSS receiver state and retrieving location data from the hardware.
In VEE Wear, it can be used by features requiring geolocation capabilities such as activity tracking or navigation.
The full API reference is available in the GNSS Javadoc.
Low Power Management
Foreword
This section is presented as a proposed implementation of low power management, depending on hardware requirements and application constraints, things may vary (number of modes, RTOS use, power consumption, etc.).
This section illustrates what is commonly done and supported by MicroEJ.
Power Modes
The processor supports multiple power optimization modes: Active, Sleep, Deep Sleep, Deep Power-Down, and Full Deep Power-Down. The VEE Port utilizes Deep Sleep mode, which enables:
Static power-off of unused peripherals and memory banks
Sleep mode activation when the RTOS becomes idle
Configuration of peripherals and memory banks to remain active during Deep Sleep
Wake-up source determination
External PMIC VDDCORE voltage reduction during Deep Sleep
Implementation
Power optimizations integrate into FreeRTOS via tickless idle mode. This allows the FreeRTOS idle task to suspend the tick interrupt and place the system in sleep mode based on the estimated idle duration until the next scheduled event.
Mode Selection Based on Idle Time:
Active Mode: The tick interrupt continues and the system remains fully powered. Selected when low power features are disabled.
Sleep Mode: The tick interrupt is suspended and standard sleep activates without powering off peripherals. Selected when system peripherals are handling tasks (GPU computation, FrameBuffer DMA transfers).
Deep Sleep Mode: The tick interrupt is suspended, memory banks are partially powered off (data retained), clocks stop, the system runs on a low-power clock, and the external PMIC automatically provides lower VDDCORE.
Wake-up sources include buttons, capacitive screen touch, or internal counter interrupt.
Note
Initiating a debugger connection in Deep Sleep mode is impossible; thus, detecting a debugger connection has been wired as a wake-up source. When a debugger is connected, the system is restricted to Sleep mode rather than Deep Sleep when FreeRTOS idles.
Application
Watchfaces that continuously update the screen prevent the system from entering tickless idle mode. A watchface that refreshes only every second (e.g., a low-power watchface) demonstrates the power consumption impact of tickless idle mode, as the processor can enter Deep Sleep between screen updates.
Reduce Power Consumption
Overview
Three power reduction targets exist:
Reducing Active mode consumption by powering only required components
Reducing processing time through efficient hardware utilization
Reducing Deep Sleep mode consumption by limiting powered hardware elements
Performance Profiles
Performance profiles allow applications to select optimal execution configurations. Clock frequency and VDDCORE power supply adjustment provides power/performance tradeoffs.
Available Profiles:
Feature | MAX_PERFS | POWER_SAVING |
|---|---|---|
CPU Clock | 192 MHz | 96 MHz |
VDDCORE | 0.900V | 0.800V |
Feature Loader RAMs | ON | OFF |
PowerQuad | ON | OFF |
Step Service | ON | OFF |
HeartRate Service | ON | OFF |
Power Service | ON | OFF |
Notification Service | ON | OFF |
Activity Service | ON | OFF |
Applications select profiles via PowerManagementHelper.setPerfProfile(int profile)
with arguments PowerManagementHelper.PERF_PROFILE_MAX_PERFS
or PowerManagementHelper.PERF_PROFILE_POWER_SAVING.
Clipping
The Clipping feature reduces overall consumption by minimizing drawing time and reducing display transmission lines. Only modified screen regions are updated, increasing Deep Sleep duration and reducing I/O power consumption. For example, a low-power watchface can refresh only the second-hand rectangle each second, and update the hour/minute hands only every minute.
Render and Flush
Display updates involve rendering new frames and flushing them to the display. A postponed render policy flushes the previous frame during new frame rendering, enabling concurrent MCU, GPU, DMA, and SDMA operations and extending Deep Sleep duration.
Note
Rendered frames are flushed later, so graphics models must account for rendering time in advance. Time-dependent content (such as watchfaces) should render the current time plus one refresh period.
RAM Buffers
RAM partitions can be powered independently. The VEE Port optimizes power by:
Alternately powering off Framebuffer 0/1 when not required in Deep Sleep
Powering off the Feature Loader buffer in
POWER_SAVINGprofilePowering off the Kernel Feature buffer at startup, enabling it only when installing new features
This requires framebuffers, the Feature Loader buffer, the Kernel Feature buffer, and Data RAM sections to be linked to individual RAM partitions.
Note
The power optimizations only concern the MCU consumption. External peripherals like the display have not been managed and may keep consuming power when the MCU is sleeping.