7. Setup
Before compiling the application on the MicroEJ platform, several steps are required to set up the environment. These steps must be done only once. After that, follow the chapter Build the Demo to compile and deploy the application on the simulator and / or the embedded device.
7.1. MicroEJ SDK
The application has been designed to run on a dedicated MicroEJ platform. This platform provides specific foundation libraries implementations. It must be first built before being able to launch the application against it. The build requires the installation of MicroEJ SDK. Read the documentation on https://www.microej.com/product/sdk/ and https://developer.microej.com/get-started/ to download MicroEJ SDK (just install MicroEJ SDK, do not follow the whole getting started).
After the installation step, start MicroEJ SDK on a new workspace.
7.2. Artifacts Repository
As mentioned in the chapter Libraries, the MicroEJ Central Repository is not sufficient to build the platform and run the application. A dedicated repository has been built, and the MicroEJ SDK workspace must be configured to use it.
The repository is available in the package. It is already usable (no need to unzip anything).
- Go to the unzipped package folder :
[root]/artifactsRepository. - Copy the full path of the file
ivysettings.xmlavailable in this folder. - Open MicroEJ SDK.
- Open menu
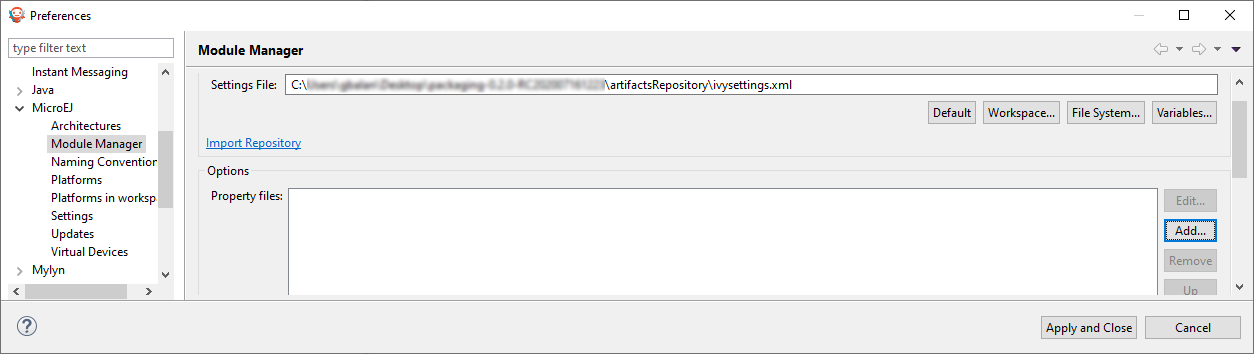
Window>Preferences. - Go to the item
MicroEJ>Module Manager. - In the text box
Module Repository Settings File, paste theivysettings.xmlfull path. - Click on
Apply and Close.
Your workspace now knows the repository. It can be used to build the platform and compile the application.
Note
The repository is a partial repository (see Additional Repository): it requires an internet connection to target the MicroEJ Central Repository (https://developer.microej.com/central-repository/).
7.3. Platform Projects
This step consists of importing some projects to build the MicroEJ platform designed for i.MX RT595 EVK Rev. C1. The platform projects are available in the package in a zip file. MicroEJ SDK allows importing a set of projects from an archive.
- Go to the unzipped package folder :
[root]/platform/. - Copy the full path of the file
mimxrt595_freertos-platform.zipavailable in this folder. - Open MicroEJ SDK.
- Open menu
File>Import.... - Go to the item
General>Existing Projects into Workspace. - Click on
Next >. - Select the radio button
Select archive file. - Paste the
mimxrt595_freertos-platform.zipfull path and pressEnter(or browse to select it from the file system). - Ensure four projects are checked.
- Click on
Finish.
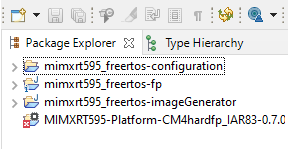
The four projects are required to build the platform:
mimxrt595_freertos-configuration: It is the leading platform configuration project. It contains a file that describes the platform features. For several features, one or several additional files are required. It also contains script files to build the platform.mimxrt595_freertos-fp: It is the simulator part of the platform. It describes how to represent the board (photo) and simulate it (touch panel, display, etc.).mimxrt595_freertos-imageGenerator: The RT595 GPU specifies some bitmap image characteristics. This project is a plugin of the MicroEJ Image Generator tool, which allows describing these characteristics.MIMXRT595-Platform-CM4hardfp_IAR83-x.y.z: This project will contain the platform source files after the platform build step. It is an empty project for the moment.
Note
Platform project throws an error (a red cross is visible on the project icon on the left). This is not an issue: the platform is not built yet, and MicroEJ Workbench considers the platform invalid. Don’t care about these errors/warnings and go to the next step.
7.4. Platform Build
For the moment, no platform is available in your workspace. The empty project MIMXRT595-Platform-CM4hardfp_IAR83-x.y.z does not yet represent a valid platform.
- Open menu
Window>Preferences. - Go to the item
MicroEJ>Platforms in workspace. - The list is empty: there is no platform yet.
- Click on
Apply and Close. - Click on
mimxrt595_freertos-configurationproject to select it. - Click on the blue button available in the toolbar; it is called
Build Selected Module.

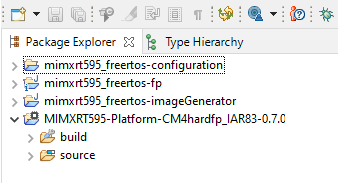
Platform building starts. You can see the build steps in the console. At the end of the build, the project MIMXRT595-Platform-CM4hardfp_IAR83-x.y.z contains two folders: build and source:
Note
If the project remains empty, right-click on it and select Refresh.
You can retrieve the new platform in the Platforms in workspace menu:
- Open menu
Window>Preferences. - Go to the item
MicroEJ>Platforms in workspace.
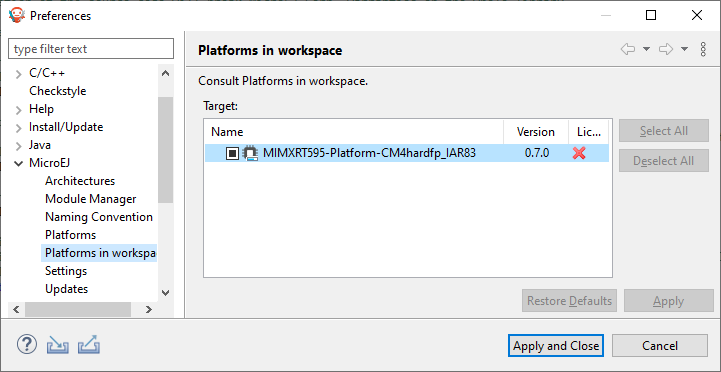
Note
The red cross means the platform requires a license to be used.
The platform is now built. It can be used to build the application.
7.5. Application Project
Like the platform, the application project is available in a zip in the package.
- Go to the unzipped package folder :
[root]/application/. - Copy the full path of the file
application-src.zipavailable in this folder. - Open MicroEJ SDK.
- Open menu
File>Import.... - Go to the item
General>Existing Projects into Workspace. - Click on
Next >. - Select the radio button
Select archive file. - Paste the
application-src.zipfull path and pressEnter(or browse to select it from the file system). - Ensure that all six projects are checked.
- Click on
Finish.
The application project is now available in your workspace. MicroEJ workbench automatically resolves its dependencies using the partial repository and the MicroEJ Central Repository. In a second time, Eclipse launches its automatic build workspace.
See next chapter to launch the application on the platform.
 Docs
Docs Resources
 Forum
Forum