5. Images
5.1. MicroUI Images
MicroUI manages pixelated images (bitmap). These images can be loaded dynamically at runtime (using embedded PNG decoder) or already in a RAW format (no need to decode pixel data at runtime). The images can be located in the application ROM section or external flash memory (SDcard etc.). In all cases, MicroUI implementation ensures the images to render are decoded (RAW format) and located in a byte-addressable memory. It offers the possibility to render a pixelated image using dedicated C functions (draw image, rotate image, scale image, etc.).
![digraph {
rankdir=LR;
{
png [label="png", shape=note]
jpg [label="jpg", shape=note]
bmp [label="bmp", shape=note]
raw [label="raw", shape=note]
ig [label="Image Generator", shape=rect]
app [label="Application", shape=rect]
ll [label="LLUI_Painter.h", shape=signature]
sa [label="Software Algorithm", shape=rect]
gpu [label="GPU", shape=rect]
i [label="", image="images/applist_50.png", shape=plaintext]
}
subgraph flow {
{png, jpg, bmp} -> ig -> raw -> app
app -> {ll, sa}
ll -> gpu -> i
sa -> i
}
}](../_images/graphviz-5face431284a67e707d859fb14b81e3bdedd4592.png)
To use an image as a MicroUI Image, the source image (PNG, JPG, etc.) must be available in the MicroEJ application classpath. Then its path must be added in a file whose extension is .images.list. This file allows the MicroEJ platform to know which images have to be embedded and which have to be decoded in the RAW format before being embedded.
Refers to the MicroEJ official documentation https://docs.microej.com/en/latest/ApplicationDeveloperGuide/classpath.html and https://docs.microej.com/en/latest/PlatformDeveloperGuide/imageGenerator.html to have more information about the MicroUI Image engine.
5.2. Vector Images
5.2.1. Principle
Foundation library VG Lite included in the MicroEJ platform for i.MX RT595 EVK Rev. C1 allows rendering vector images. A vector image is a succession on VG paths. A dedicated engine decodes the VG images paths and uses the following VG Lite function to render the paths:
vg_lite_drawvg_lite_draw_grad
The engine is composed of two parts:
- Generator part: the vector image is first analyzed at application compile-time. A representation of this image is generated and used in the VG engine in a second part.
- Runtime part: the generated representation is rendered at runtime.
![digraph {
rankdir=LR;
{
f [label="VG image file"]
t [label="VG tool"]
r [label="VG resource"]
l [label="VGLite"]
g [label="GCNanoLiteV"]
d [label="LCD"]
}
subgraph cluster_compiletime {
label="Compile time";
f -> t -> r
}
subgraph cluster_compileruntime {
label="Run time";
r -> l -> g -> d
}
}](../_images/graphviz-2585a7d7b82a4b0194b63c39720947a6cadc0083.png)
Some restrictions on the embedded engine require the use of VG images under certain conditions. These restrictions may change in the future depending on the evolution of the VG engine:
- Draw only closed shapes
- Optimize the number of shapes to limit their quantity (e.g., Merge shapes that look the same)
- Use linear color gradients
MicroEJ provides the SVG2MVG tool that converts SVG images to the runtime representation.
5.2.2. Tool Aim
The tool aims to convert an SVG image into a format that is supported by the platform. The current version converts SVG documents to either B-ON immutables or Java source code.
The tool supports a subset of SVGTiny: https://www.w3.org/TR/SVGTiny12/. This table presents what is supported by the tool and by the GCNanoLite-V.
| Feature | GCNanoLite-V | SVG2MVG Tool | ||
|---|---|---|---|---|
| Supported | Unsupported | Supported | Unsupported | |
| Path | Move, Line, Close path, Curve (bezier) | Circle arcs | Move, Line, Close path, Curve (bezier) | Circle arcs (1) |
| Basic shapes | No | Rectangle, Line, Polygon, Polyline | Circle (2), Ellipse (2) | |
| Painting Filling | Yes | Yes | ||
| Painting Stroking | No | No (3) | ||
| Painting Gradient | Linear, one pattern | Radial | Linear, one pattern | Radial |
| Painting Color | Yes | Only #RRGGBB (4) | ||
| Painting Other | No | No | ||
| Transforms | Yes | No (5) | ||
| Text | No | No (2) | ||
| Multimedia | No | No | ||
| Interactivity | No | No | ||
| Linking | No | No | ||
| Scripting | No | No | ||
| Animation | No | No | ||
| Fonts | No | No | ||
| Metadata | No | No | ||
(4): These features will be available in future versions.
Warning
The tool has been developed with Inkscape as the reference Vector Graphics editor, and the support of SVG formats is partial. Other editors like Illustrator from Adobe might generate incompatible SVG files.
If the SVG has been generated with another tool than Inkscape, it is strongly suggested to import it into Inkscape and save it as Inkscape SVG before using it with the tool.
5.2.3. Convert Unsupported Features to Supported Ones
It is possible to convert some of the unsupported features into features that are supported.
(1) Elliptical arc curves: can be converted with Inkscape following these steps:
- install
Apply Transformsextension (https://github.com/Klowner/inkscape-applytransforms) to Inkscape, - double-click on the element to convert,
- in the menu, select
Extensions,Modify Path,Apply Transforms, - the arc curves are now bezier curves.
- install
(2) Circle and ellipse shapes and texts: can be converted with Inkscape following these steps:
- select the shape to convert,
- in the menu, select
Path,Object to Path, - the shape is now a path containing arc curves that need to be converted to bezier curves.
(3) Stroke: can be converted with Inkscape following these steps:
- select the element with the stroke to convert,
- in the menu, select
Path,Stroke to Path, - the stroke is now a path containing arc curves that need to be converted to bezier curves.
(5) Transformations: can be converted with Inkscape following these steps:
- install
Apply Transformsextension (https://github.com/Klowner/inkscape-applytransforms) to Inkscape, - double-click on the element to convert,
- in the menu, select
Extensions,Modify Path,Apply Transforms, - the transformations are now applied in the element coordinates.
- install
Class attributes (SVG 2.0): can be converted with Inkscape following these steps:
- select all the elements of the image,
- cut them (
Edit,Cut), - paste them in place (
Edit,Paste In Place).
5.2.4. Run the Tool
The following steps describe how to add and use an SVG image in the MicroEJ application. The tool is available in package folder: [root]/tools/svg2mvg.
To print the help:
java -jar svg2mvg.jar --help
To convert an SVG document to an immutables file:
java -jar svg2mvg.jar --svg "<path-to-svg-directory>/mascot-microej.svg" -f "<path-to-java-resource-directory>" -i mascotMicroEJ.xml
It also generates a .immutables.list file that references the immutables file.
5.2.5. Use Generated Image
The generated image can be retrieved and drawn in Java:
public static void main(String[] args) {
        MicroUI.start();

        Display display = Display.getDisplay();
        GraphicsContext g = display.getGraphicsContext();

        SvgImage image = SvgImage.getSvgImage("mascot-microej.svg");
        image.draw(g);

        display.flush();
}
It can also be transformed using VGLite matrices:
public static void main(String[] args) {
        MicroUI.start();

        Display display = Display.getDisplay();
        GraphicsContext g = display.getGraphicsContext();

        vg_lite_matrix matrix = new vg_lite_matrix();
        vg_lite_matrix.vg_lite_translate(70, -30, matrix);
        vg_lite_matrix.vg_lite_scale(1.1f, 1.1f, matrix);
        vg_lite_matrix.vg_lite_rotate(42, matrix);
        SvgImage image = SvgImage.getSvgImage("mascot-microej.svg");
        image.draw(g, matrix);

        display.flush();
}
It can also then be animated using matrix transformations:
private static final float SCALE_FACTOR = 1.1f;
private static int angle;
private static vg_lite_matrix matrix;
private static boolean zoomOut;
private static float scale;
private static int scaleCount;
private static boolean animating;

public static void main(String[] args) {
        MicroUI.start();

        Display display = Display.getDisplay();
        int displayWidth = display.getWidth();
        int displayHeight = display.getHeight();
        GraphicsContext g = display.getGraphicsContext();

        SvgImage mascotMicroEJ = SvgImage.getSvgImage("mascot-microej.svg");
        matrix = new vg_lite_matrix();
        scale = 1f;
        animating = true;

        while (animating) {
                g.setColor(Colors.BLACK);
                Painter.fillRectangle(g, 0, 0, displayWidth, displayHeight);
                mascotMicroEJ.draw(g, matrix);
                display.flush();
                display.waitFlushCompleted();
                animate();
        }
}

private static void animate() {
        angle += 5;
        vg_lite_matrix.vg_lite_identity(matrix);
        vg_lite_matrix.vg_lite_translate(-10, 0, matrix);

        vg_lite_matrix.vg_lite_translate(200, 200, matrix);

        if (zoomOut) {
                scale *= SCALE_FACTOR;
                vg_lite_matrix.vg_lite_scale(scale, scale, matrix);
                if (-25 == --scaleCount) {
                        zoomOut = false;
                }
        } else {
                scale *= 1 / SCALE_FACTOR;
                vg_lite_matrix.vg_lite_scale(scale, scale, matrix);
                if (25 == ++scaleCount) {
                        zoomOut = true;
                }
        }

        vg_lite_matrix.vg_lite_rotate(angle, matrix);
        vg_lite_matrix.vg_lite_translate(-200, -200, matrix);
}
5.2.6. Use Different Formats
The precision of the points in the generated images can be configured by setting a format argument. Depending on the format, the image’s size changes (the lesser the precision, the smaller the size).
Example:
java -jar svg2mvg.jar --svg "<path-to-svg-directory>/mascot-microej.svg" -f "<path-to-java-resource-directory>" -i mascotMicroEJ.xml --format S16
There are four possible values:
FP32: points coordinates are on afloat(signed 32-bit floating-point value). This is the default format.S32: points coordinates are on aint(signed 32-bit value).S16: points coordinates are on ashort(signed 16-bit value).S8: points coordinates are on abyte(signed 8-bit value).
5.2.7. Use Java Generation
It can be more convenient to convert the SVG to Java code. The generated code is easier to understand and has a very similar structure to SVG’s XML.
Warning
Compared to immutables, the generated Java code will have a bigger ROM footprint and require more Java heap at runtime.
To convert an SVG document to a Java class:
java -jar svg2mvg.jar --svg "<path-to-svg-directory>/mascot-microej.svg" -f "<path-to-java-source-directory>" -c my.package.MascotMicroEJ
The generated image can be instantiated and drawn in Java:
public static void main(String[] args) {
             MicroUI.start();

             Display display = Display.getDisplay();
             GraphicsContext g = display.getGraphicsContext();

             new MascotMicroEJ().draw(g);

             display.flush();
     }
5.3. Software Accelerated Rotation
5.3.1. Principle
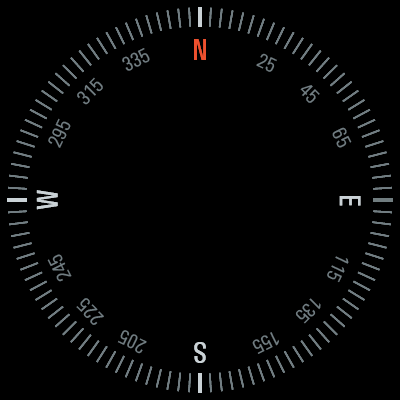
The software accelerated rotation is a piece of code that allows rendering an image with a rotation without using a hardware accelerator but with good performances. This software engine demonstrates the CPU qualities: high calculation speed, instructions pipeline, fast memory access, memory cache, etc.
The engine is the original MicroUI rotation engine but drastically reduced to manage a specific kind of image and destination. The image to rotate and the destination have to respect several points:
- The image is fully opaque
- The image format is RGB565
- The destination area format is RGB565
- The image area is a square (width == height)
- The destination area size is equal to the image area size
- The rotation center is the center of the image (and center of destination area)
- The area to rotate is circular: diameter is equal to the image width (and so height)
- To have better performance, the central circular area should not be rotated. The rendering is faster when the internal area diameter is near the external diameter.

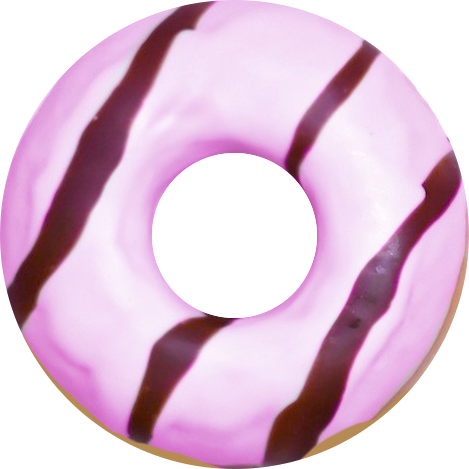
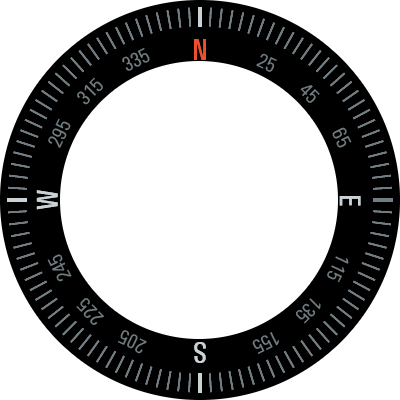
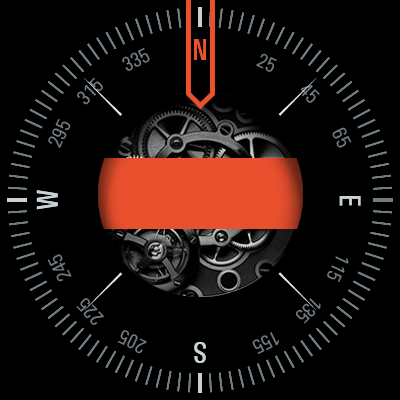
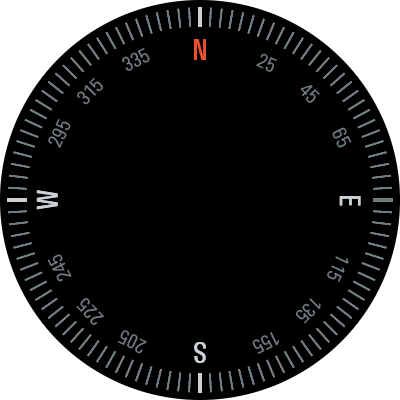
This software accelerated rotation has been used to rotate the compass image. Only the peripheral data is rotated: the centered data is fixed, and the corners are useless. The compass image has been reduced to rotate only the required pixels: first, fixed image data (centered image and accessories) and the corners of the image are removed, then the image is hollowed out. The number of pixels to rotate is drastically reduced.

5.3.2. Tool Aim
The tool aims to find for each line (from left to right and top to bottom)
- the first non-transparent pixel
- the next transparent pixel
- the next non-transparent pixel
- the next transparent pixel
- go to next line
If there is only one sequence of non-transparent pixel / transparent pixel on a given line, steps 3 and 4 are ignored.
The authorized lines are:
- fully transparent,
- fully opaque,
- the first part is transparent, and the second part is opaque,
- the first part is opaque, and the second part is transparent,
- the first and third parts are transparent, and the second part is opaque,
- the first and third parts are opaque, and the second part is transparent,
- the first and third parts are transparent, and the second and fourth parts are opaque,
- the first and third parts are opaque, and the second and fourth parts are transparent.
All other combinations are forbidden. When an invalid is detected, the tool stops line parsing and goes to the next line.
The tool generates an immutables file with an array. This array describes for each image line the drawing blocks and transparent blocks (maximum two blocks of each). This array is used by the rotation algorithm in addition with the source image (the image which contains the pixels). However, the image may be different from the image used to generate the immutables array. For instance, the application can embed the full compass image in the following example (see Image Preparation) instead of embedding the simplified image. This is mainly useful to reuse the image for animations.
5.3.3. Image Preparation
- Open the image with an image editor.
- Ensure the image is fully opaque.
- Ensure image size is equal to display size.
- Replace each corner with a fully transparent aliased area.
- Hollow out the image (center area of the image): replace the center of the image with a fully transparent aliased disc.
- Save the image as a PNG.
5.3.4. Run the Tool
The tool is available in package folder: [root]/tools/tore-to-immutables
- Just type in a terminal:
java -jar tore-to-immutables my_image.png
- This creates a file called
my_image_immutables.xmlcontaining
 <immutables>
  <array id="myImage" type="byte[]">
      <elem value="186"/>
      <elem value="214"/>
      <elem value="214"/>
      ...
  </array>
</immutables>
When an image line does not respect the line specification (see upper), a warning is printed, line parsing is stopped, and the tool goes to the next line.
[Warning] Line 3 has too many plain and hole elements (error at x=244)
[Warning] Line 8 has too many plain and hole elements (error at x=263)
[Warning] Line 15 has too many plain and hole elements (error at x=281)
5.3.5. Update Application
- Copy the generated immutable file in the project (often in source folder
src/main/resources/, packageresources) - Create or open an
.immutables.listfile - Add an item to embed the immutable file:
resources/my_image_immutables.xml - Embed the source image as usual (in a
.images.listfile, with or without an output format) - In the application, call the method
RotateCircular.drawNearestNeighborCircularImage()giving the immutables array in parameter:
Image myImage = Image.getImage("/images/myImage.png");
int[] myImageData = (int[]) Immutables.get("myImage");
RotateCircular.drawNearestNeighborCircularImage(g, myImage, myImageData, 50);
 Docs
Docs Resources
 Forum
Forum