5. Images
5.1. MicroUI Images
MicroUI manages pixelated images (bitmap). These images can be loaded dynamically at runtime (using embedded PNG decoder) or already in a RAW format (no need to decode pixel data at runtime). The images can be located in the application ROM section or external flash memory (SDcard, etc.). In all cases, MicroUI implementation ensures the images to render are decoded (RAW format) and located in a byte-addressable memory. It offers the possibility to render a pixelated image using dedicated C functions (draw image, rotate image, scale image, etc.).
![digraph {
rankdir=LR;
{
png [label="png", shape=note]
jpg [label="jpg", shape=note]
bmp [label="bmp", shape=note]
raw [label="raw", shape=note]
ig [label="Image Generator", shape=rect]
app [label="Application", shape=rect]
ll [label="LLUI_Painter.h", shape=signature]
sa [label="Software Algorithm", shape=rect]
gpu [label="GPU", shape=rect]
i [label="", image="images/applist_50.png", shape=plaintext]
}
subgraph flow {
{png, jpg, bmp} -> ig -> raw -> app
app -> {ll, sa}
ll -> gpu -> i
sa -> i
}
}](../_images/graphviz-5face431284a67e707d859fb14b81e3bdedd4592.png)
To use an image as a MicroUI Image, the source image (PNG, JPG, etc.) must be available in the MicroEJ application classpath. Then its path must be added in a file whose extension is .images.list. This file allows the MicroEJ platform to know which images have to be embedded and which have to be decoded in the RAW format before being embedded.
Refers to the MicroEJ official documentation https://docs.microej.com/en/latest/ApplicationDeveloperGuide/classpath.html and https://docs.microej.com/en/latest/PlatformDeveloperGuide/uiImageGenerator.html to have more information about the MicroUI Image engine.
5.2. Vector Images
5.2.1. Principle
Foundation library MicroVG included in the MicroEJ platform for MIMXRT595-EVK allows rendering vector images. A vector image is a succession on VG paths. A dedicated engine decodes the VG images paths and uses the following VG Lite functions to render the paths:
vg_lite_drawvg_lite_draw_grad
The engine is composed of two parts:
- Generator part: the vector image is first analyzed at application compile-time. A representation of this image is generated and used in the VG engine in a second part.
- Runtime part: the generated representation is rendered at runtime.
![digraph {
rankdir=LR;
{
f [label="VG image file"]
t [label="VG tool"]
r [label="VG resource"]
l [label="VGLite"]
g [label="GCNanoLiteV"]
d [label="LCD"]
}
subgraph cluster_compiletime {
label="Compile time";
f -> t -> r
}
subgraph cluster_compileruntime {
label="Run time";
r -> l -> g -> d
}
}](../_images/graphviz-2585a7d7b82a4b0194b63c39720947a6cadc0083.png)
Some restrictions on the embedded engine require the use of VG images under certain conditions. These restrictions may change in the future depending on the evolution of the VG engine:
- Draw only closed shapes
- Optimize the number of shapes to limit their quantity (e.g., merge shapes that look the same)
- Use linear color gradients
Refer to MicroVG VectorImage documentation for more details.
5.3. Software Accelerated Rotation
5.3.1. Principle
The software accelerated rotation is a piece of code that allows rendering an image with a rotation without using a hardware accelerator but with good performances. This software engine demonstrates the CPU qualities: high calculation speed, instructions pipeline, fast memory access, memory cache, etc.
The engine is the original MicroUI rotation engine but drastically reduced to manage a specific kind of image and destination. The image to rotate and the destination have to respect several points:
- The image is fully opaque
- The image format is RGB565
- The destination area format is RGB565
- The image area is a square (width == height)
- The destination area size is equal to the image area size
- The rotation center is the center of the image (and center of destination area)
- The area to rotate is circular: diameter is equal to the image width (and so height)
- To have better performance, the central circular area should not be rotated. The rendering is faster when the internal area diameter is near the external diameter.

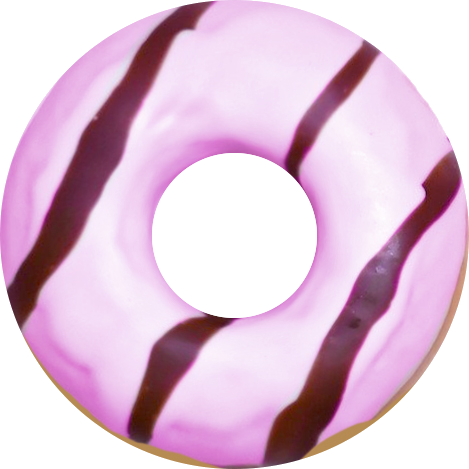

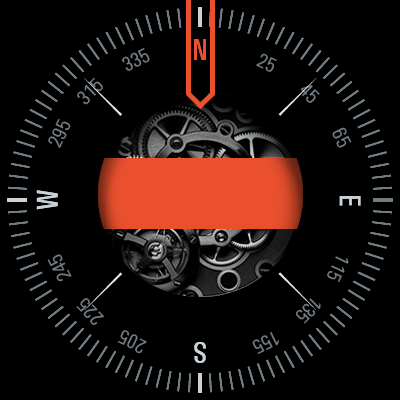
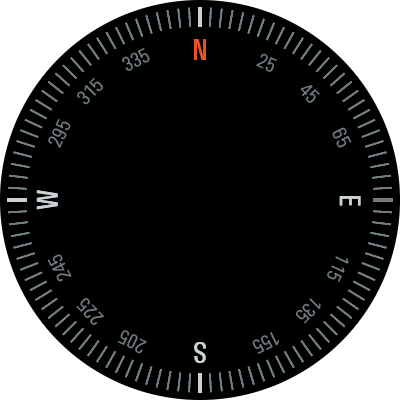
This software accelerated rotation has been used to rotate the compass image. Only the peripheral data is rotated: the centered data is fixed, and the corners are useless. The compass image has been reduced to rotate only the required pixels: first, fixed image data (centered image and accessories) and the corners of the image are removed, then the image is hollowed out. The number of pixels to rotate is drastically reduced.

5.3.2. Tool Aim
The tool aims to find for each line (from left to right and top to bottom)
- the first non-transparent pixel
- the next transparent pixel
- the next non-transparent pixel
- the next transparent pixel
- go to next line
If there is only one sequence of non-transparent pixel / transparent pixel on a given line, steps 3 and 4 are ignored.
The authorized lines are:
- fully transparent,
- fully opaque,
- the first part is transparent, and the second part is opaque,
- the first part is opaque, and the second part is transparent,
- the first and third parts are transparent, and the second part is opaque,
- the first and third parts are opaque, and the second part is transparent,
- the first and third parts are transparent, and the second and fourth parts are opaque,
- the first and third parts are opaque, and the second and fourth parts are transparent.
All other combinations are forbidden. When an invalid is detected, the tool stops line parsing and goes to the next line.
The tool generates an immutables file with an array. This array describes for each image line the drawing blocks and transparent blocks (maximum two blocks of each). This array is used by the rotation algorithm in addition with the source image (the image which contains the pixels). However, the image may be different from the image used to generate the immutables array. For instance, the application can embed the full compass image in the following example (see Image Preparation) instead of embedding the simplified image. This is mainly useful to reuse the image for animations.
5.3.3. Image Preparation
- Open the image with an image editor.
- Ensure the image is fully opaque.
- Ensure image size is equal to display size.
- Replace each corner with a fully transparent aliased area.
- Hollow out the image (center area of the image): replace the center of the image with a fully transparent aliased disc.
- Save the image as a PNG.
5.3.4. Run the Tool
The tool is available in package folder: [root]/tools/tore-to-immutables
- Just type in a terminal:
java -jar tore-to-immutables my_image.png
- This creates a file called
my_image_immutables.xmlcontaining
 <immutables>
  <array id="myImage" type="byte[]">
      <elem value="186"/>
      <elem value="214"/>
      <elem value="214"/>
      ...
  </array>
</immutables>
When an image line does not respect the line specification (see upper), a warning is printed, line parsing is stopped, and the tool goes to the next line.
[Warning] Line 3 has too many plain and hole elements (error at x=244)
[Warning] Line 8 has too many plain and hole elements (error at x=263)
[Warning] Line 15 has too many plain and hole elements (error at x=281)
5.3.5. Update Application
- Copy the generated immutable file in the project (often in source folder
src/main/resources/, packageresources) - Create or open an
.immutables.listfile - Add an item to embed the immutable file:
resources/my_image_immutables.xml - Embed the source image as usual (in a
.images.listfile, with or without an output format) - In the application, call the method
RotateCircular.drawNearestNeighborCircularImage()giving the immutables array in parameter:
Image myImage = Image.getImage("/images/myImage.png");
int[] myImageData = (int[]) Immutables.get("myImage");
RotateCircular.drawNearestNeighborCircularImage(g, myImage, myImageData, 50);
 Docs
Docs Resources
 Forum
Forum